

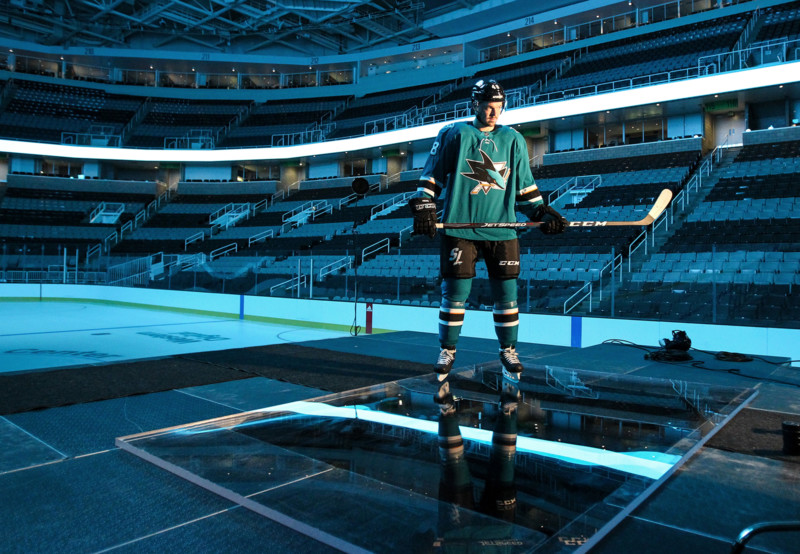
Ever since joining the San Jose Sharks two years ago, I’ve looked for different ways to photograph hockey and showcase our athletes. There was one specific photo that I had been thinking about for a while. The concept would be to create a photo from below the ice, as if looking up at a Sharks player inside SAP Center.
I already had a general idea of how to make this happen, using a large piece of plexiglass. The first time I saw it was from my old mentor, Donald Miralle, who shot Bryce Harper of the Washington Nationals back in the day. A few other photographers had done this as well, but almost all of these shoots were done outside with the sky as the background, or with a blacked-out background. I hadn’t seen it done with a hockey player, and I wanted to have the background be the SAP Center itself.
It is really hard to find or create a truly original image that hasn’t been done before, but what you can do is see what other people have created and make a version that is your own – take inspiration and add your own spice to it.
Planning
I wish I could say it’s super easy to come up with an idea and execute it, but in reality, there are a lot of hoops to jump through. Not only was there the cost of the plexi, which was a little over $4,000, but I had to work with our building ops in order to make sure we could build a sturdy and safe set to hold the plexiglass, ask the control room to properly light the ceiling and set the video board, collaborate with our designers to create the graphics for the video board, talk with our PR team to figure out which players we should photograph, and, of course, make sure our players were down to be involved and that it was extremely safe for them.
The last thing we wanted to happen was for a player to get injured during a shoot before the season even started. Fortunately, we got the green light to make it happen, and Timo Meier, Tomas Hertl, and Erik Karlsson were all in.

Once everything was approved, I still had a lot of planning to do. I’m pretty comfortable when it comes to lighting portraits, but usually when I try something new I set it all up and test it out beforehand. This wasn’t exactly possible in this case for multiple reasons, so I had to sketch out some examples of what we needed to build, and how we would light it.
The plan was for a 4-light setup: 1 key light, 2 massive reflectors with grids down the ice to help separate the player from the background, and 1 constant light on the player to help my camera so it could focus.
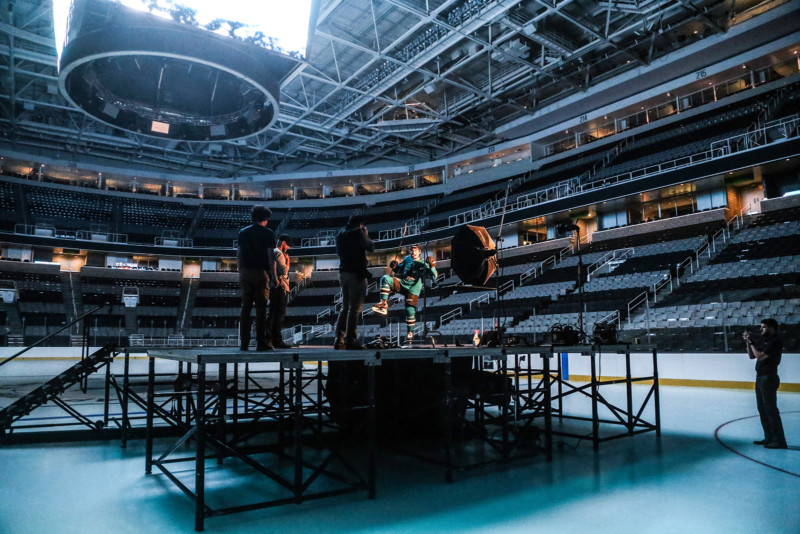
Then we figured out how to build a stage on which to put the plexiglass. Fortunately, our building guys have built many stages in their time, since we have concerts and other live events come to SAP Center regularly. I provided the dimensions of the plexiglass to them (9 feet by 6.5 feet, and 1.5 inches thick), and they built a stage that had a hole for us to fit the plexiglass onto.
After it was all setup, my window through the plexiglass was around 7 feet by 5 feet.
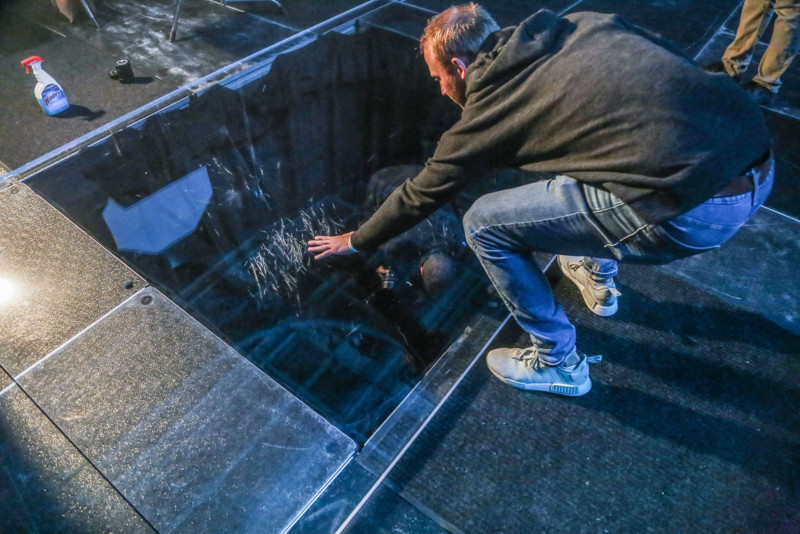
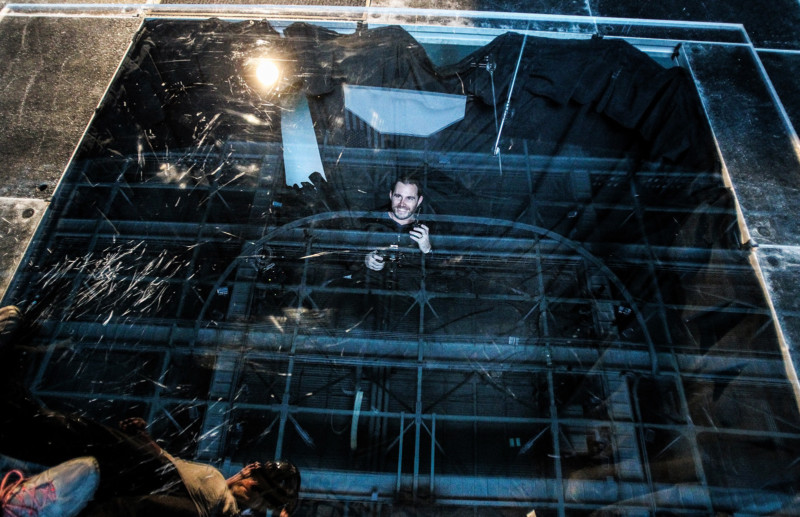
The next part was figuring out how to avoid unwanted reflections in the plexiglass. Even though I would be shooting through the glass, I would see any and all reflections from below. In order to avoid this, I needed to black out everything around me (including myself) so we created a box with black drapes, and I dressed myself in black as well.
Here is what it looked like from above and below:


Execution
Then came the final part: actually taking the photos! To me, this is usually the easiest (and fastest) part of the process.
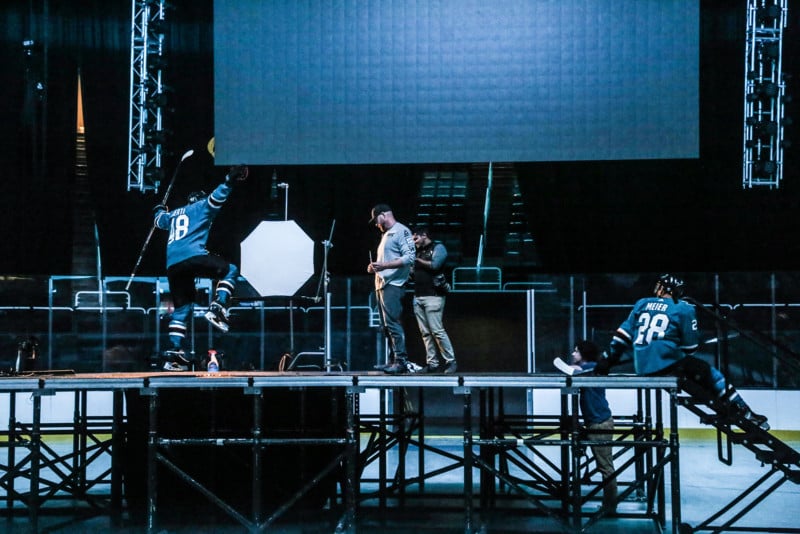
I had been planning this for months, and the stage/lights were set up early in the morning over a four-hour period. The shoot itself lasted no more than 20 minutes with all three players. Honestly, 20 minutes is a lot of time—I’ve been on shoots before where you have an athlete for less than one minute, so I took advantage of every minute I had.
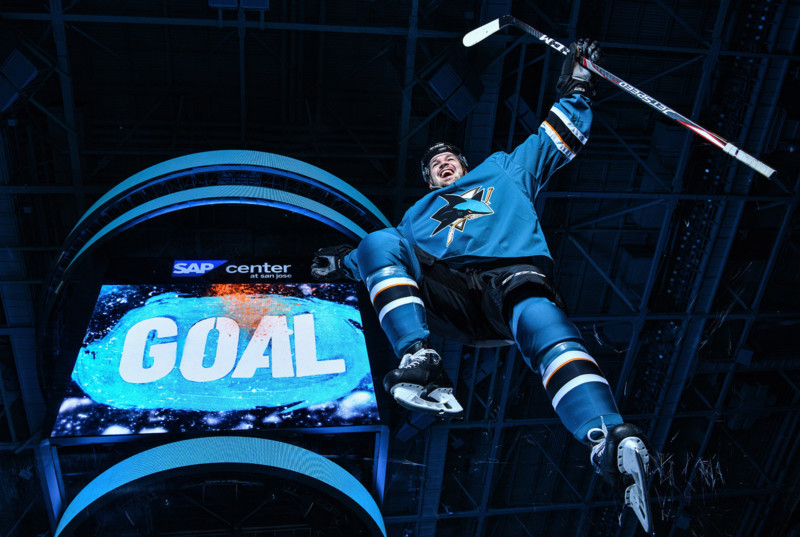
I had some games photos and a mood board ready to show the players so they could recreate goal celebrations and reactions that they had during actual games. This helped give the guys an idea of how to pose since they knew what I was looking for.
Since I was down below in a black box, I had to use a walkie talkie in order to direct the players above and the control room to change the video board graphics. This proved to be a bit difficult with the walkie talkies sometimes going in and out, or the sounds not being too clear, but we were able to make it work!
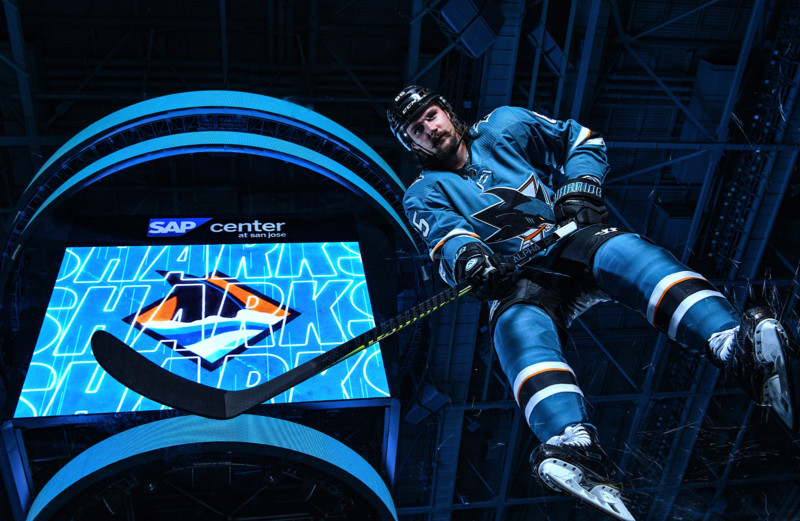
As you can see, plexiglass can be pretty fragile, so it got scratched quickly and constantly needed to be wiped from smudges. By the time we got to shooting the third and final player the plexi was all scratched and beat up, which we expected since the guys were wearing skates.
Also, for the entire shoot I was laying directly on the ice so by the time it was over I was freezing. But it didn’t matter because I was stoked about the images that I saw from the back of the camera. Here are a few more behind-the-scenes images from the shoot:


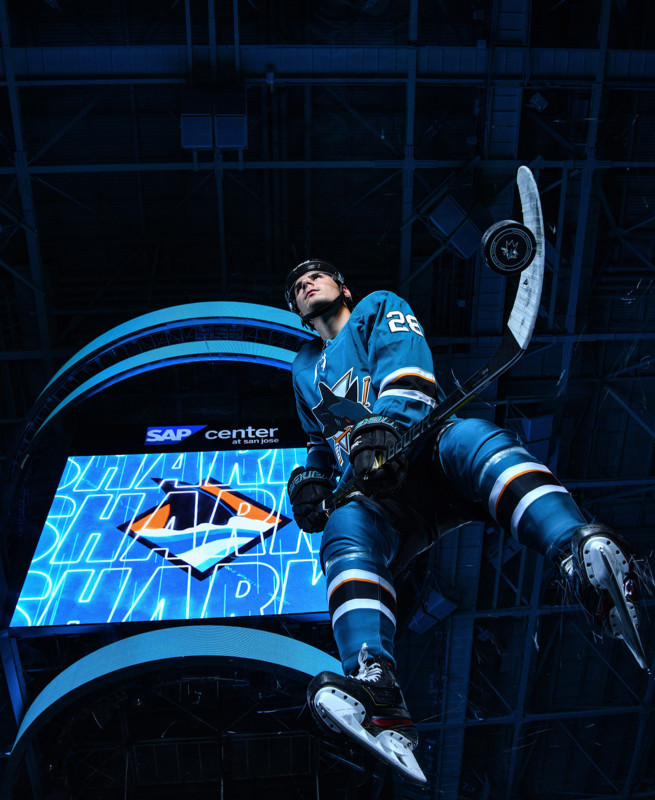
And here are a few of the final results:


Final Thoughts
Overall, I was pretty happy with how the images turned out. It was one of the most fun yet challenging photo shoots that I had worked on. For some reason, those shoots are the most rewarding.
I have a great time during the season shooting Sharks games, but it becomes all-to-easy to just go through the motions when you have so many games—it can feel really repetitive after a while. Sometimes, you need to push the envelope and try something new to help get the creative juices flowing. We all need to press the refresh button from time to time and change things up.
I hope you enjoyed getting to see a what it takes to turn an idea into a photo. A big shout out to my team here at the Sharks, and my friend Cooper for making this shoot possible and supporting my creativity. I wouldn’t have been able to do this without them.
About the author: Brandon Magnus is an award-winning San Diego-based sports photographer whose work has been featured in ESPN, Sports Illustrated, The New York Times, Rollingstone and more. You can find more of his work on his website, or by following him on Instagram.


