When it comes to free broadcasting software, there’s only one contender: OBS, or Open Broadcaster Software. Though until 2018 the open-source app looked like it came straight from Windows 98, a UI update has provided a much-needed facelift. It also makes OBS easier to use, especially for those new to the world of livestreaming.
It still doesn’t come with any kind of tutorial though, and sorting through sources and scenes might be confusing for some. Don’t worry; we’ve been using OBS for some time, and here’s where we talk you through everything you need to know about OBS, from connecting to your streaming platform to adding a live webcam feed to your game streams.
If OBS seems a little complicated, why not take a look at our recommendations of the best capture and streaming software for PC and opt for something that’s easier to use?
Set up OBS to stream on Twitch, YouTube and Facebook
The first step in live streaming your favourite games using OBS is to connect to your preferred streaming platform, be it YouTube, Facebook or Twitch. OBS does support other services, as well as the ability to connect to a custom streaming server, but we’ll only be covering the three most popular platforms in this tutorial.
To connect to your preferred livestream platform, follow these steps:
- Right-click OBS and select Run as Administrator if you’re using the software on Windows, as it’s necessary to have admin permissions when using Game Capture software on PC.
- Click File > Settings and select the Stream tab on the left-hand side.
From here, you’ll have to select your platform. Each service has a slightly different setup process, so we’ll run through each below.
Twitch
- Select Twitch from the dropdown list of Streaming Services.
- On your Twitch TV dashboard, select Settings > Stream Key > Show Key, agreeing to on-screen prompts warning you not to share your key with anybody else.
- Copy and paste the Stream Key into the Stream Key box in the Broadcast Settings menu in OBS, then click Apply.
YouTube
- Select YouTube/YouTube Gaming from the dropdown list of Streaming Services.
- Head to your YouTube Creator Studio and select the Live Streaming tab on the left.
- Locate the Encoder Setup section and click Reveal to reveal your Stream Key.
- Copy and paste the Stream Key into the Stream Key box in the Broadcast Settings menu in OBS, then click Apply.

Facebook Live
- Select Facebook Live from the dropdown list of Streaming Services.
- Head to the Facebook Live creation page, and click Create Live Stream (don’t worry, you don’t have to go live right away!).
- In the Connect tab, make sure the “Enable persistent stream key” box is selected.
- Copy and paste the Stream Key into the Stream Key box in the Broadcast Settings menu in OBS, then click Apply.

How to set up your stream layout
Now you’ve configured your stream, the next step is to set up the layout of your stream, whether that’s by adding a live webcam feed, adding your Twitter handle so people can follow you, or simply by adding nice images or a banner around the edges of your stream.
OBS has two windows; scenes and sources. Each scene is comprised of multiple sources, from the game capture window to your live webcam input and more. You can create multiple scenes for different games and load them up simply by selecting them from the scene menu, giving your stream layout a more custom look.
If you want to keep it simple, you can create a single scene for all games too!
Once you’ve created your scene, you’ll need to add your sources. Here’s how to add the most important visual elements for any successful live stream.
Add your game source
Most crucially, you need to select the window that OBS is going to capture and stream. To do this:
- Click the Plus icon in the Sources menu and select Game Capture.
- Give your game capture a name to make it easily recognisable amongst several sources.
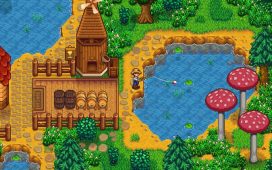
- Now you can customise the capture settings. The mode is what’s important here: you can set it up to automatically capture any fullscreen application, capture the foreground window when a hotkey is pressed or manually select which window should be captured (though that will require you to start the game for it to appear). If you’ve got a game capture card, this is where you should select it.
- Once you’re happy, click OK to save your settings and add the source to your scene.
Add your webcam
If you really want to add some personality to your live streams, why not include your live webcam feed? It’ll allow your followers to see how you react to crucial game moments both in-game and in real life, and provides more of a connection to your audience. We’ve rounded up a selection of the best webcams for streaming if you’re in the market for one.
- Click the Plus icon in the Sources menu and select Video Capture Device.
- Give your Video Capture Device a name – we’d recommend calling it webcam, but it’s down to you.
- You’ll now be able to access the webcam capture properties. Select your webcam from the Device drop-down and tweak any other settings (though we’d recommend sticking with the default settings if you’re not video-savvy).
- Once you’re happy, click OK to add your webcam to your scene.
- If you want to resize or move your camera input, simply click on it and drag the corners to adjust the size, or click-and-drag anywhere else to move the webcam feed.

Add text
You can also add text to direct followers to your social media accounts to help build your following. It’s easy to do too:
- Click the Plus icon in the Sources menu and select Text (GDI+).
- Enter a name for your text box – this is the name of the source, not the text that’s displayed.
- In the text menu, you can customise the look of your font. Change the font, size, colour, opacity and more to get the desired effect, and add the text you’d like to be displayed in the Text window.
- Once you’re ready, click OK to close the window and save the text.
- You should now see the text displayed on-screen. To adjust the position, select Edit Scene and simply drag-and-drop the text to the desired location. You can also select the red dots to adjust the size of the text.

You can also design your own custom text to add to your livestream. For more information, check out our tutorial on adding text to live streams using OBS.
Add images
If you want to give your live stream that custom finish, why not add a custom banner? It’s really easy to add images to your OBS live stream:
- In the Sources box, click Add > Image and name the source to easily locate it amongst other sources (best to describe the image you’re including).
- Click Browse… to find the saved image on your computer, and click Open to use it. If you want it to be transparent, change the Opacity to a number less than 100.
- Once you’ve finished tweaking the settings, click OK to add the image to your livestream.
- Like with other sources, if you move your image, simply drag-and-drop the image to where you want it to be.
How to initiate livestream
Once you’ve connected to your preferred streaming platform and you’re happy with the placement of all your on-screen elements, it’s time to go live. In OBS, it’s easy to go live – simply click Start Streaming in the bottom-right corner of the main OBS window.


